Reserve stock in Shopify (Exchange orders -> Only for Shopify)
Allows to reserve stock item in exchange orders to prevent either disable exchanges or having out of stock in the exchanges process and impact positively on NPS
It is important to know that this feature is available only for Shopify and Shopify_V2
How to access it?
- Go to Refund Methods -> Exchange -> Find Reserve stock untill exchange order is created.

- Merchants can:
-
Enable / disable stock reservation
-
Select the amount of time for the stock to be reserved
-
By default the Stock Reservation will be disabled and number of days to be reserved (when enabled) will be 2 days.
How does the Stock Reservation work?
- When a customer create an exchange order:
- iF platform checks if Stock Reservation is activated or not
- Disactivated -> keeps with the standard process.
- Activated:
- Calculate date and time for stock reservation
- Create Draft Order
- Save Draft Order ID
- iF platform checks if Stock Reservation is activated or not
- This is how Stock Reservation will be displayed on the Shopify.

-
If date has passed: stock won’t be reserved any longer, nevertheless, order can be placed anyway if the exchange is triggered
- If date hasn't passed: then the stock will be reserved until the new exchange order is placed
- If customers need to complete a payment from ecommerce platform
- iF will send a payment link
- After payment is procceded a real order will be created
- If customers don't need to complete a payment from ecommerce platform
- A real order will be created
Automatize Return Customs Documentation: Return Invoice / DUA
Ability to automatize the document for returns and being able to download it.
To configure it merchants need to contact Support Center
How it works?
- First of all, it is important to understnad if merchants need Custom Documentation or not
- If merchants don't need custom Documentation the iF platform will create a label in the carrier without any return invoices.
- Configure if Return Invoice is automated or not
- If Merchants don't have an automated return invoice then:
- Merchants need to upload documents on the platform. This is how merchants will see Return control window on Manage Returns screen.

After that merchants need to Approve the item and will be able to Confirm
- The label and return invoice will be created.
- Merchants need to upload documents on the platform. This is how merchants will see Return control window on Manage Returns screen.
- If Merchants have an automated return invoice then:
- It will create a return invoice
- Create a label
- If Merchants don't have an automated return invoice then:
Where merchants can download it?
- Merchants can download it either from Transportation or Manage Returns screen.
- Go to Manage Returns -> click on the Green dolar Icon.
From the Return Control of your Return Order click on the "Download Label" it will automatically download label and return invoice
- Go to Transportation -> click on the Green eye icon of order -> click on "Download label"
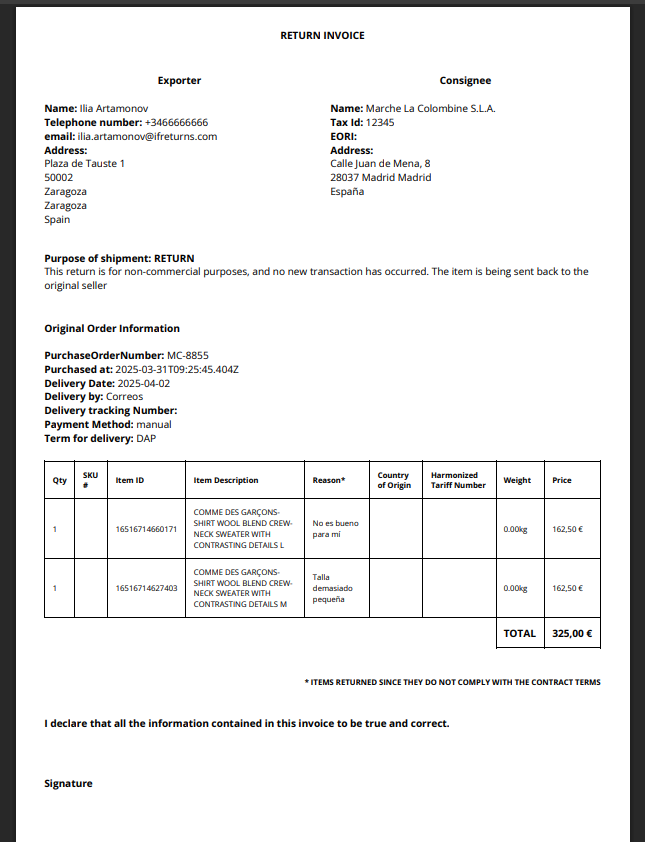
What information is included in the Return Invoice?
- Merchants can find the following information:
-
Title: Return Invoice
-
Exporter: Includes the address data from the client:
-
Name
-
telephone number
-
email
-
address
-
-
Cosignee: Includes Company fiscal information:
-
Company fiscal Name
-
Tax ID
-
EORI
-
Fiscal Address
-
- Original Order Information:
- Purchase Order number
- Original Order purchased at
- Original Order Delivered at
- Delivered by
- Delivery tracking number
- Payment Method
- Incoterm for Delivery: ‘DAP’ by default
- Line items:
- Qty
- SKU
- Item ID
- Item description:
- Reason
- Price and currency
- Harmonized Tariff Number
- Weight
- Country of Origin
- Total amount
- Airwaybill / tracking number
- Declaration
-
- See example of the Auto-generated Return Invoice:
Change configuration for FAQ connection
- A configuration that offers 3 different models.
- To configure one of the models please contact support center
Here are the 3 models merchants can select:
- Mailto: We display a message and add a link that is mailto:{mailShop}

- Merchant Contact Site: for the contact merchant site we will include a link that redirects and opens in a NEW PAGE, the contact link of their website

- iF Support. Includes FAQ page -> https://help.ifreturns.com/en/faq

The default mode by store will be: Merchant Contact Site, where by default we include the same link as the “return policy” link.
Allow to incluide Postal Code Ranges
A new OR condition in the Postal code that allows to be configured and used for a single rule.
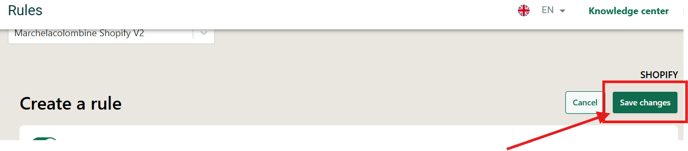
- Navigate on Settings -> Rules

- Click on "Add rule" button

- Click on "+Add condition"
- Select "Postal Code" and click on "Confirm" button
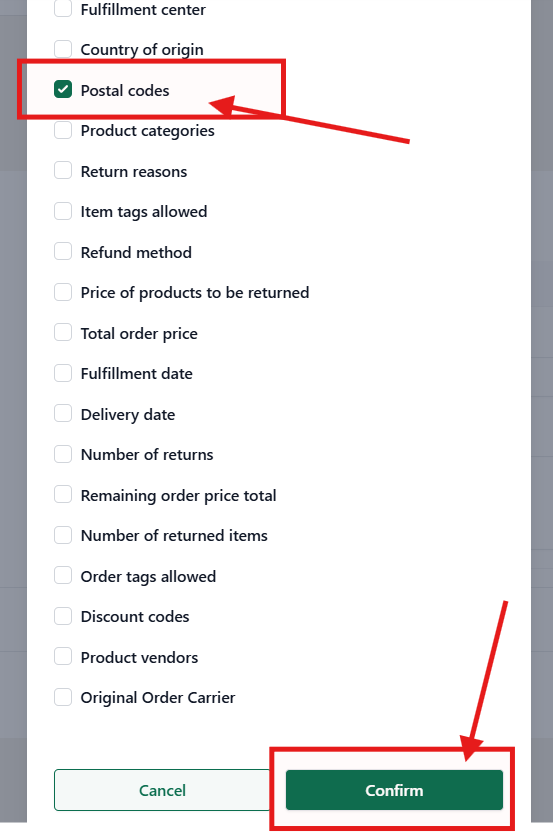
- You can add 2,3 or more postal codes
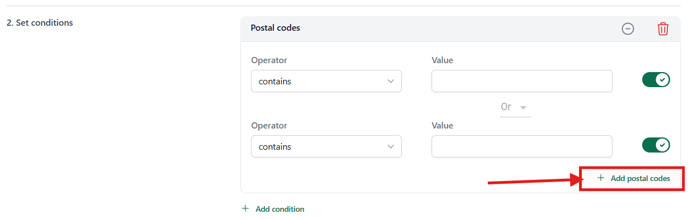
The condition "OR" means that to trigger the rule one of the postal codes should match the customer's / order's postal code.
Let's say we put Value 50002 and 50001. If customer's postal code is 31500 then the rule will not be triggered.
- If you want to disactive one of the conditions simply click on the toggle button

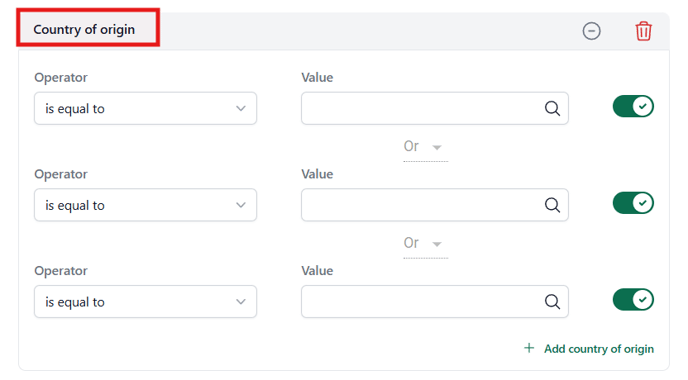
- it is possible to apply "OR" to other conditions. For example Country of Origin
- Same as with other actoins/conditions it is possible to duplicate rule that has Postal Code and "OR" conditions

- Don't forget to save changes